This guest article was written by Tori Bortman, owner and operator of Gracie’s Wrench, which offers private and group bike maintenance clinics (and more). Tori wrote a similar article for us last spring, but this one’s new and improved!
Thanks to El Nino, spring has officially sprung a bit early this year. Not that I’m complaining. More long weekend rides, less getting caught in torrential downpours — I’m all for it.
You may be ready for spring… but is your bike?
If you haven’t taken the time this winter to give your bicycle a thorough re-vamp, now is the time. That doesn’t mean you have to go running to the shop. Start slow and bring your steed back to life with some simple steps that will make your next ride practically dreamy.
Framing the issue
ABC Quick Check:
- A is for air
- B is for brakes
- C is for cranks, chain and cassette
- Quick is for quick releases
- Check is for check it over
Start with what people see first, your frame. Brush the large bits off while dry and follow with a spray-on cleanser (Cirtisolve or Simple Green) and wipe it down. Cleaning with a hose or a bucket of soapy water can get into bearings and wash the valuable grease away but is okay if you’re careful to avoid the bearings and never use a high-pressure hose or sprayer.
Not sure where the bearings are? Any part on your bike that spins (wheels, pedals, etc.) have them inside. Look carefully for places where the spinning actuates and avoid soaping or spraying those completely.
You vs. the black build-up
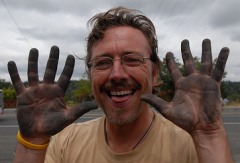
Next up is removing the black build-up –all the pumice-filled road grime and brake dust—from your rims paying special notice to the braking surface. A dry cloth works best because this insidious stuff has a tendency to smear if you use cleanser. If your silver rims are now black all over and you have no other choice, get the big bits off with the dry cloth then use a light spray-on cleanser to wipe clean. This should actually be done each time you lube the chain (but we’ve all been known to let things go a bit!) and will increase power, the life of your wheels and quiet your brakes.
To take it a step further, remove your wheels and scuff up the braking surface of your pads with emery cloth, a file or sand paper to ensure any build-up doesn’t transfer back to the rim surface. Don’t even think about using that emery cloth on your rims unless you want to shorten your wheel life substantially.
Lube that chain
Speaking of chains, they need lubrication about every 100 miles. Unless, as it sometimes happens in our lovely winters, the chain gets wet and in that case lube it as soon as you can when it’s dry. The lube I recommend is ATB, because it’s a conditioner and shampoo in one. Part of oiling a chain is wiping the excess off afterwards. Every time. No cheating or your rims and frame will end up covered in oil. You’ll also miss the opportunity to clean the chain with the small amount of solvent that comes mixed in with the ATB lube by wiping it down after oiling. A beautiful, gleaming chain every time!
Once again if the neglect is too far gone you can use some WD-40 or other solvent (like Citrisolve) sprayed onto a rag to clean the old grime off your chain. Run the chain through the rag instead of spraying the chain directly as it can leave a residue that will ruin the fresh oil you apply after cleaning. Warning! WD-40 is not used as a lubricant but as a cleanser and is in no way a replacement for properly oiling your chain. After 2000 miles, swing into the shop to see if you’re ready for a new chain altogether. Then you don’t have to clean it until next time!
Get to know your tires — or get new ones
As for your tires, inflate them to the higher side of the recommended range imprinted on the sidewall of the rubber. Surprisingly, this combined with oiling your chain can often make your ride feel brand new. Get up-close and friendly with them to check for cuts, cracks in the sidewall or a flattened out surface on the tread. Any of these means one thing: after a long, sweet relationship, it’s time to end it. And Momma’s gets a new set of tires!
A little icing on the cake
As a final touch, new bar tape or grips can make your bike seem fresh like the day it rolled into your life. It’s important not just to be safe, but to look good doing it.
As you journey forward with your shiny, clean friend, remember that bike shops give free estimates. If your cleaning revealed that there are larger problems (like your brake pads are gone, your shifting doesn’t work, there’s a super sketchy rattle coming deep from the depths within), don’t be afraid to get friendly with your local bike shop. You might just find this is the first step to that blossoming summer romance with your ride.
— Learn more about your bike in one of Tori’s excellent classes. Check out GraciesWrench.com for more info.





Thanks for reading.
BikePortland has served this community with independent community journalism since 2005. We rely on subscriptions from readers like you to survive. Your financial support is vital in keeping this valuable resource alive and well.
Please subscribe today to strengthen and expand our work.
Nice understatement, Gracie: “Unless, as it sometimes happens in our lovely winters, the chain gets wet and in that case lube it as soon as you can when it’s dry.” When I commuted with a “normal” bike, I think I interpreted “when it’s dry” as “when the winter’s over.” After a few years of perpetual chain and gear grinding from all that muck and grime, I got a bike with a chain case and roller brakes. HALLELUJAH!
Lube that chain! This is all great advice. A well-maintained bike doesn’t squeak, rattle, clang, or make any noise at all. If you can hear your bike, LISTEN — it’s telling you that it needs your attention.
only if you can figure it out. when i take it to the bike shop, everyone says the noise is normal, even if drives me nuts. 😛
Pardon my paraphrase: “Start with what [thieves] see first, your frame.”
Another thing I like to do every so often is lift up each end of my bike and spin each wheel to look for wobble. If you see a wobble, then you can go around the wheel gently squeezing a couple of spokes at a time, which reveals whether there are any that are loose–or even broken. Alternatively, you can “pluck” each spoke and listen to the pitch. If any spokes are dramatically looser than the others, getting an inexpensive spoke wrench and tightening it up can really reduce the wobble.
Nothing makes your bike seem like a clunker more than a noisy chain or wobbly wheels.
Tori and everybody,
I have a great old Schwinn w/ the original old handlebar grips –they’re kind of a soft vinyl(?). When the weather heats up they get softer and start to slip when they shouldn’t –like when I’m going up a hill.
What can I do to get them to stay in place?
Thx!
-John
John,
I’m not an expert on those but I’d first try a little hairspray. Remove the grip by getting a little rubbing alcohol beneath it. Once removed, let it dry out then put a small squirt of cheap harispray inside then slide them back on. It will take a few days for the alcohol to evaporate out but it should leave you with slightly more grip than before.
Good luck!
Tori