

Tori Bortman is here to help you
gain confidence in patching tubes.
(Photos: Daniel Sharp)
Most folks don’t like to patch tubes for many reasons: “It takes too long,” “it never holds,” or “I just carry a new tube.” Carrying an extra tube will only get you through one flat per ride, and occasionally the new tube will fail. I’m always a fan of carrying a patch kit — and knowing how to use it can make the repair quick, easy and practically pain free.
A standard patch kit comes with three things: a patch, some “glue,” and a small piece of emery cloth. All of these are of equal importance in the success of the patch holding. More on this—and pre-glued patches—later.
A properly patched flat is as reliable as a new tube! Even if you don’t patch on the road, bring your bum tube home and repair it for the next ride. Ready? Here we go…

Step 1: Find the Culprit
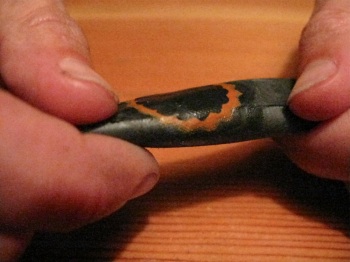
Over inflate your tube so that it looks slightly misshapen. The tube is basically a skinny balloon so it can take a little extra air. Put it to your ear or against your cheek to listen and feel for the air escaping. A hole one the outside of the tube (opposite of the valve stem) means something came through your tire like glass or metal. A hole on the inside of the tube is most likely caused by your rim strip (half moon shape) or a pinch flat (small slit or two next to each other, sometimes called a “snake bite”). Occasionally the hole is too small to find. In this case, you’ll have to wait until you’re near water and try submerging the inflated tube to find the air escaping.

Step 2: Prep the Area
Deflate the tube of any remaining air. Using the edge of the emery cloth or sand paper, mark a 1-inch square around the hole(s). This will give you a point of reference for where the hole is because you soon won’t be able to see it any longer, and you want to know where to put the patch.
Next, using the emery cloth rough up the area inside the square you marked until it gives you a dull surface with lots of rubber debris like from a pencil eraser. Taking an extra 30 seconds to do this right will make the next step quick, easy and make for the most reliable patch.

Step 3: Apply the Vulcanizing Fluid
Vulcanizing fluid (boy, I love saying those words. Vulcanizing. Fluid. Yes.) is your “glue”. The difference? Glue holds two things together. Through a chemical reaction, vulcanizing fluid allows a rubber surface to accept and bond to a new piece of rubber, a.k.a.: the patch, making it like new.
Apply the vulcanizing fluid inside the square in a thin but even layer all the way to the edges. This might seem like a much larger area than you need, but it’s easy to under estimate how big the patch is, so go big. Use the tip of the tube to spread it evenly—the dirt and grease from your fingers can interfere with the vulcanizing process. The more the surface has been roughed up the more material the fluid has to interact with and the quicker it will dry, usually in under 30 seconds if done properly. Because it’s a chemical reaction, blowing on it or holding a lighter to it will not speed things up. Only Step 2 can do that!
Step 4: Let the Vulcanizing Fluid Dry
The fluid must be completely dry before you apply the patch. The tube is ready when the glue goes from looking shiny-wet to matte-dull. While you wait, clear debris from your tire or fix other issues that caused the flat.

Step 5: Apply the Patch
Peel the foil from the back of the patch and apply the rubber side down. Press down firmly rubbing from the center of the patch outward. You can peel the plastic layer away or leave it on. If you try to remove it and the patch comes off with it, you didn’t make get a solid contact and should start over. If you’ve followed these steps, chances are this won’t happen!
Step 6: Check the Seal
Finally, over inflate your tube again to make sure its holding air. Nothing worse than finding out your patch didn’t hold after you put the wheel back on your bike!

A word about “glueless” patches.
Patches advertised as “glueless” come with the vulcanizing fluid pre-applied to one side. You still need to follow steps 1, 2 and 5, and be extra careful to keep the sticky side of the patch clean before you apply it to the tube or it won’t hold.
I don’t recommend these because I’ve found that they’ve failed more often and sometimes break free later or stick to the inside of the tire. If you like them and have had success, stick with (ahem) what’s working for you.
— For more tips and tricks from professional mechanic and maintenance educator Tori Bortman read previous Optimize Your Ride columns. Learn more about Tori and consider taking one of her classes at GraciesWrench.com.