

(Photos: Daniel Sharp)
When you break it down, your bicycle only needs to do two things: Go and stop.
In our last column we discussed the go (chains), today we’ll delve into the stop (brakes).
The Pacific Northwest is known for many things, but one of the most insidious is the slow, grinding away of bike rims and brake pads. I’m no scientist; but my deduction? Our volcanic soils create tiny pumice particulate, which on rainy days get splattered all over your rims and brake pads turning them into tiny grinding stones.
You may think your bike mechanic’s hands are covered in grease, but most of the time you’re seeing a thick coat of black brake dust.
For simplicity, let’s call that rim grime “brake dust.” Brake dust is the product of the road grit and the rubber from your brake pad wearing down. You may think your bike mechanic’s hands are covered in grease, but most of the time you’re seeing a thick coat of black brake dust.
As your brake pads wear, they are lightly dry-lubricating the rim—to stop have you to pull harder on the lever and put more braking force on the wheel. Add some rainwater and you’ve got a wet lubricant, too, and slowing down isn’t so easy.
What’s a cyclist to do?
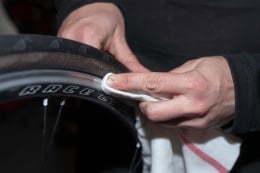
Take a dry, clean cloth (paying close attention to the part of the rim that contacts the brake pads) rub your rim clean. If it has been a while since you’ve cleaned your rims, get the bulk of the brake dust off with a dry cloth, then use a cleanser (Simple Green, soapy dish water, or rubbing alcohol are all good, gentle choices) to remove the rest. I don’t recommend using cleanser first as wet brake dust smears and is more difficult to remove.
This simple maintenance can add years to the rim life of your wheel and greatly improve your braking power.
Make cleaning you rims and part of regular maintenance: lube and clean your chain, then clean your rims (with a different rag- mind you) and the whole shebang should take less than 10 minutes.
What about that horrid “SCREECH!” your bike’s been making at stoplights?
To fix it, remove your wheels and examine the face of the pad where they contact the rim. Often you’ll find that they’re covered in a glossy sheen instead looking dull and grippy (like a pencil eraser). Slick surfaces don’t stop nearly as well (duh).
Take a small piece of sandpaper and buff through the shiny layer until the braking surface looks dull again. Don’t be surprised if you also notice a few small flakes of metal in the pads (this is from road grit getting caught and scraping away metal from your rim. It’s important to pick the metal from the pad or it’s constant scraping will bring your rims to an untimely death). If you notice more than a few metal flakes it’s best to start over with new pads (I recommend Kool Stop salmon colored pads — they’re grippy but gentle on rims).
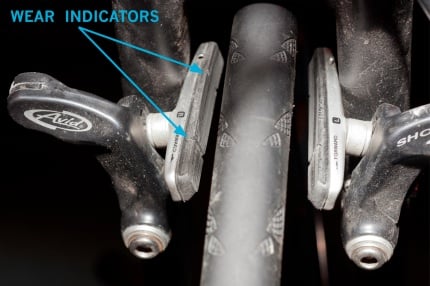
Another sign that your pads need to be replaced is when your brake levers reach close to the handlebar. Peek down at your pads from above the bike. All rim brake pads come built with indents that serve as wear indicators. If one or more of the indents are worn away, it’s time for new pads. (See image above.)
Of course, you could always try disc brakes. Disc brake pads last two to four times as long as regular pads and they don’t loose stopping power in the rain.
Disc brake maintenance is super-easy as well. Occasionally wipe the rotors clean of debris with a dry cloth or wet with a bit of rubbing alcohol. Be careful not to expose the rotors to any oil—even from your bare hands.
Hope this brake-down was helpful. Feel free to share your tips, tricks and advice in the comments.
— Tori Bortman is the owner of Portland-based Gracie’s Wrench, a business that offers individual and group bike repair classes tailored to your needs. Column sponsorship is available. Please contact info[at]bikeportland[dot]org.